🚀 Quickstart
In a hurry? This is the whole build in four steps. Every step is explained in detail further down the page.
รีบไหม? นี่คือทั้งหมดใน 4 ขั้นตอน ทุกขั้นตอนมีคำอธิบายละเอียดด้านล่างของหน้านี้
赶时间?整个搭建只需四步。每一步在本页下方都有详细讲解。
1 Download the files
Get all seven files from the 📥 Download the files section and save them in one folder: Downloads\windows_stack\. The important ones are requirements.txt, the Modelfile, tutor.py and agent.py.
ดาวน์โหลดไฟล์ทั้ง 7 จากส่วน 📥 ดาวน์โหลดไฟล์ แล้วเก็บไว้ในโฟลเดอร์เดียว: Downloads\windows_stack\ ไฟล์สำคัญคือ requirements.txt, Modelfile, tutor.py และ agent.py
从 📥 下载文件 部分下载全部 7 个文件,放进同一个文件夹:Downloads\windows_stack\。最重要的是 requirements.txt、Modelfile、tutor.py 和 agent.py。
2 Install Ollama + Python, pull the models
Install with winget, open the Ollama app once from the Start menu, then pull the three models (~8 GB total).
ติดตั้งด้วย winget เปิดแอป Ollama จาก Start menu หนึ่งครั้ง แล้ว pull โมเดลทั้งสาม (รวม ~8 GB)
用 winget 安装,先从开始菜单打开一次 Ollama 应用,然后拉取三个模型(共约 8 GB)。
3 Set up the folder — venv, Modelfile, notes
Everything lives in one folder. Create the virtual environment, install the Python packages, bake the Modelfile into the kru-ai model, and make a notes\ folder — the .md files you put there are the personal files LlamaIndex reads.
ทุกอย่างอยู่ในโฟลเดอร์เดียว สร้าง virtual environment ติดตั้งแพ็กเกจ Python สร้างโมเดล kru-ai จาก Modelfile และสร้างโฟลเดอร์ notes\ — ไฟล์ .md ที่คุณใส่ไว้คือไฟล์ส่วนตัวที่ LlamaIndex อ่าน
所有东西都放在一个文件夹里。创建虚拟环境、安装 Python 包、用 Modelfile 生成 kru-ai 模型,再建一个 notes\ 文件夹 — 你放进去的 .md 文件就是 LlamaIndex 读取的个人资料。
Skipped ollama create? No problem — tutor.py creates the kru-ai model itself on first run.
ข้าม ollama create ไป? ไม่เป็นไร — tutor.py สร้างโมเดล kru-ai ให้เองตอนรันครั้งแรก
跳过了 ollama create?没关系 — tutor.py 第一次运行时会自己创建 kru-ai 模型。
4 Run the scripts
Both are chat loops in your terminal. Type a question; press Enter on an empty line to quit.
ทั้งสองเป็นโปรแกรมแชทใน terminal พิมพ์คำถาม กด Enter บนบรรทัดว่างเพื่อออก
两个都是终端里的聊天程序。输入问题;在空行按回车退出。
🧭 What the scripts are for
tutor.py changes what the model knows — before answering, it looks up your notes\ files with LlamaIndex, then replies as Kru AI and cites which file the answer came from. agent.py changes what the model can do — Hermes 3 reads your question, decides which Python tool to call (calculator, date counter, file reader), runs it, and answers with the result in hand.
tutor.py เปลี่ยนสิ่งที่โมเดลรู้ — ก่อนตอบ มันค้นไฟล์ใน notes\ ด้วย LlamaIndex แล้วตอบในบทบาท Kru AI พร้อมบอกว่าคำตอบมาจากไฟล์ไหน agent.py เปลี่ยนสิ่งที่โมเดลทำได้ — Hermes 3 อ่านคำถาม เลือกเครื่องมือ Python ที่จะเรียก (เครื่องคิดเลข นับวัน อ่านไฟล์) รันมัน แล้วตอบด้วยผลลัพธ์ที่ได้
tutor.py 改变模型知道什么 — 回答之前,它先用 LlamaIndex 查你 notes\ 里的文件,然后以 Kru AI 的身份回答,并注明答案来自哪个文件。agent.py 改变模型能做什么 — Hermes 3 读你的问题,决定调用哪个 Python 工具(计算器、日期计算、读文件),运行它,再带着结果回答。
| Script | What it actually does | Models it needs | Run it when… |
|---|---|---|---|
📚 tutor.py |
Builds a LlamaIndex over every .md file in notes\, then answers questions as kru-ai and lists the source files. Creates the kru-ai model on first run. |
llama3.2 + nomic-embed-text |
You want answers from your own notes — study sheets, vocabulary, class facts. |
🛠️ agent.py |
Gives Hermes 3 four tools — multiply, divide, days-until-date, read-notes — and shows its reasoning out loud as it picks one. Try "How many days until Songkran 2027?" | hermes3:8b |
You want to watch tool-calling work — math, dates, or actions a chat model gets wrong. |
🧠 karpathy_tutor.py |
Same RAG trick as tutor.py but over Karpathy's 23 blog posts, with the index saved to disk so the second run starts instantly. |
llama3.2 + nomic-embed-text |
You want to see RAG scale from ten notes to a real corpus. |
Want to understand every line? The 🔬 Code walkthroughs section takes both scripts apart.
อยากเข้าใจทุกบรรทัด? ส่วน 🔬 Code walkthroughs อธิบายทั้งสองสคริปต์แบบละเอียด
想看懂每一行代码?🔬 代码讲解 部分把两个脚本逐行拆开讲。
🎬 Watch first — what is an agent?
OVERVIEW · ภาพรวม · 概览
Three minutes. The video explains what an agent is, what Ollama does, and the three upgrades you will install. Watch it first — the rest of the page will feel easy.
สามนาที วิดีโออธิบายว่า agent คืออะไร Ollama ทำอะไร และอัปเกรดสามอย่างที่คุณจะติดตั้ง ดูก่อน — แล้วส่วนที่เหลือของหน้าจะง่ายขึ้นมาก
三分钟。视频讲清楚什么是代理(agent)、Ollama 是做什么的,以及你将安装的三次升级。先看视频 — 页面的其余部分就会变得很容易。
A computer reads the words — the voice is synthetic. · เสียงบรรยายเป็นเสียงสังเคราะห์ เลือกภาษาซับไตเติลได้ด้านบน · 旁白为合成语音,字幕语言可在上方选择。
🦙 The big picture — one runner, three upgrades
Ollama is the engine. It downloads AI models and runs them on your own PC. On its own, it can only chat. This guide adds three upgrades. Each upgrade gives the model one new power.
Ollama คือเครื่องยนต์ มันดาวน์โหลดโมเดล AI และรันบนพีซีของคุณเอง ลำพังตัวมันทำได้แค่คุย คู่มือนี้เพิ่มอัปเกรดสามอย่าง แต่ละอัปเกรดให้พลังใหม่หนึ่งอย่างกับโมเดล
Ollama 是发动机。它下载 AI 模型,并在你自己的电脑上运行。它自己只会聊天。本指南加上三次升级,每次升级给模型一种新能力。
| Piece | What it is | The new power |
|---|---|---|
| 🦙 Ollama | A free program that runs AI models on your PC. | The base: private chat, no cloud. |
| 🦴 Modelfile | A small text file with the model's job description. | The model knows who it is (Kru AI). |
| 📚 LlamaIndex | A Python library that turns your files into a searchable index. | The model knows your files (RAG). |
| 🛠️ Hermes 3 | A model trained to pick and call tools. | The model can do things — it becomes an agent. |
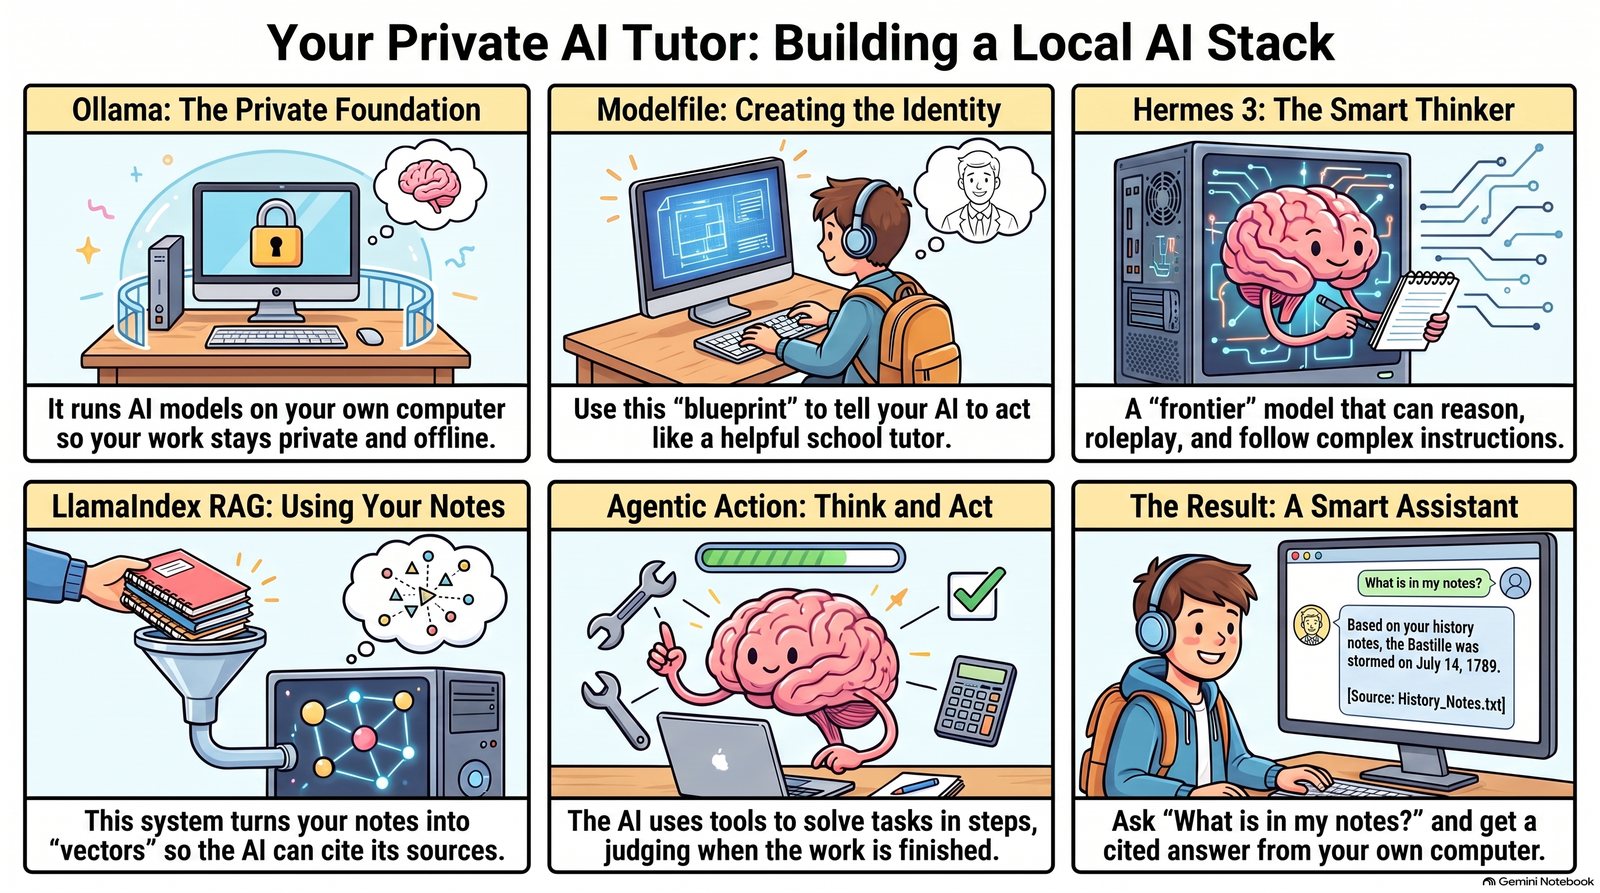
How the four pieces fit together. Made with NotebookLM from the official Ollama, LlamaIndex and Hermes documents. · ชิ้นส่วนทั้งสี่ประกอบกันอย่างไร (สร้างด้วย NotebookLM จากเอกสารจริง) · 四个部分如何组合(用 NotebookLM 从官方文档生成)。
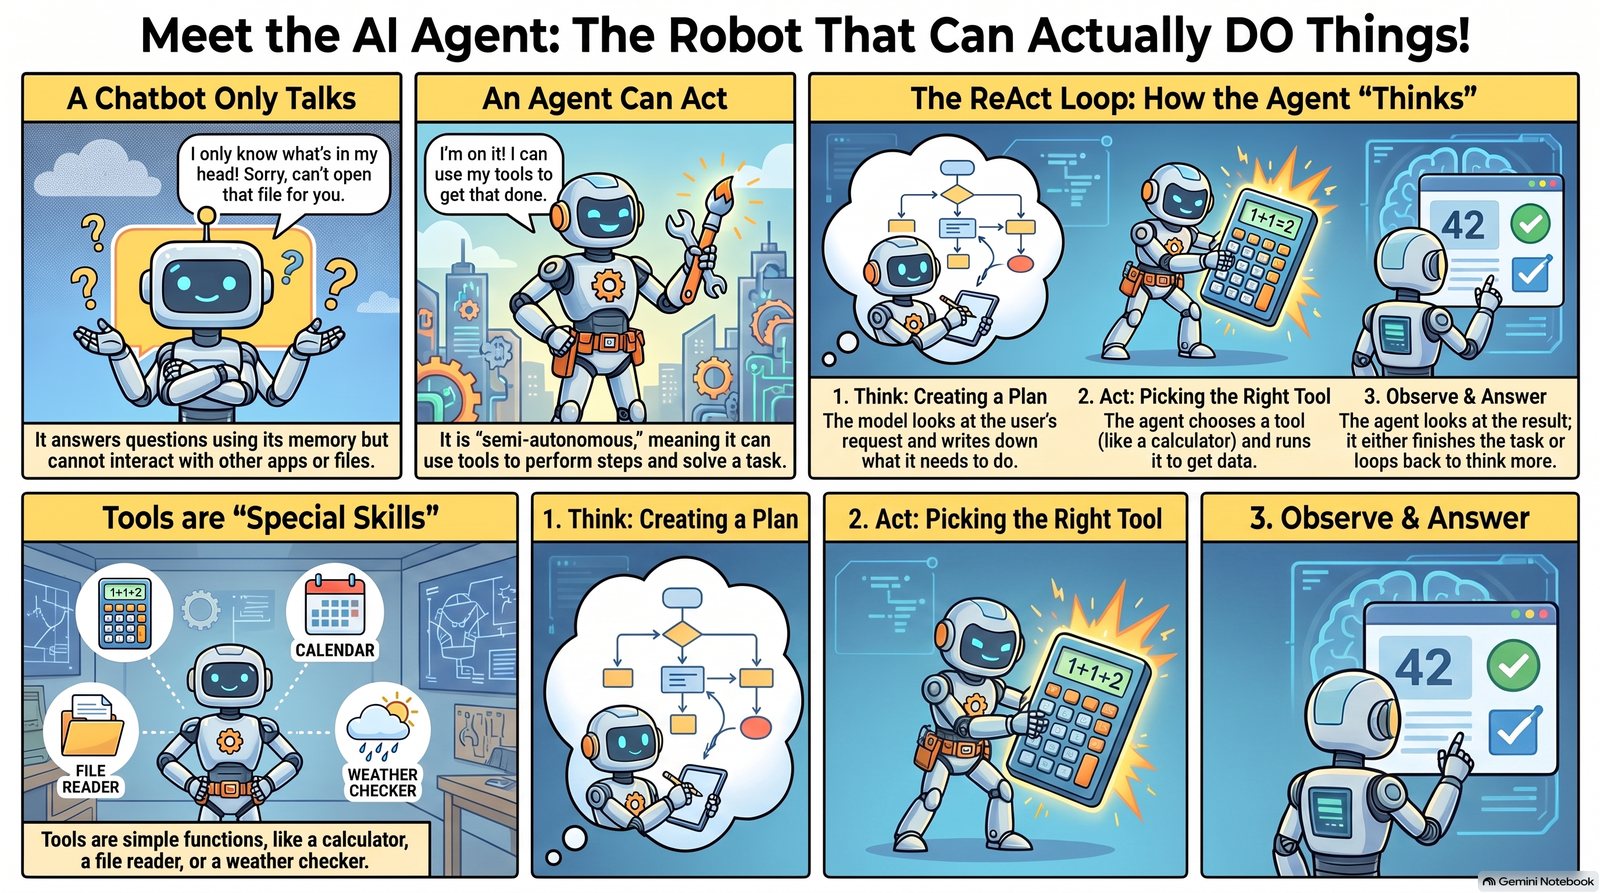
What an agent is: the model thinks, picks a tool, runs it, and answers with the result. · Agent คืออะไร: โมเดลคิด เลือกเครื่องมือ รันมัน แล้วตอบพร้อมผลลัพธ์ · 什么是代理:模型思考、选工具、运行它、带着结果回答。
🧭 What you're building
🇬🇧 English
By the end of this guide, you will have an AI tutor on your Windows PC. It runs with no cloud. It will know who it is (a system prompt). It can look up your notes and Karpathy's blog (LlamaIndex). And it can use tools, like a calculator or a file reader (Hermes agent).
🇹🇭 ไทย
เมื่อจบคู่มือนี้ คุณจะมี AI ติวเตอร์ที่ทำงานบนพีซี Windows ของคุณทั้งหมด มันจะรู้ว่ามันเป็นใคร (ระบบพรอมต์) ค้นหาโน้ตของคุณและบล็อกของ Karpathy ได้ (LlamaIndex) และใช้เครื่องมือต่าง ๆ เช่น เครื่องคิดเลขหรือตัวอ่านไฟล์ได้ (Hermes agent)
🇨🇳 中文
读完本指南后,你会拥有一个完全在你的 Windows 电脑上运行的 AI 家教。它会知道自己是谁(系统提示)、能查找你自己的笔记和 Karpathy 的博客(LlamaIndex)、并会使用计算器或文件读取等工具(Hermes 代理)。
💡 The big idea — four ways to teach a model
You will meet four different ways to teach an AI. They are not the same. The real skill is knowing which one to use.
คุณจะได้เรียนรู้วิธีใส่ข้อมูลเข้า AI สี่วิธีที่ต่างกันมาก ทั้งสี่วิธีไม่เหมือนกัน การรู้ว่าจะหยิบวิธีไหนมาใช้คือทักษะที่แท้จริง
你将学到四种把信息送进 AI 的非常不同的方法。它们并不是同一回事。知道什么时候该用哪一种,才是真正的本事。
📊 At a glance — what each technique costs and gives you
Before we install anything, here are the four techniques side-by-side. Use this table to answer "which one do I need?" without reading the whole page.
ก่อนติดตั้งอะไร ดูตารางเปรียบเทียบสี่วิธีนี้ ใช้ตอบคำถาม "ฉันต้องใช้วิธีไหน?" โดยไม่ต้องอ่านทั้งหน้า
在装任何东西之前,先把四种方法横向对比。靠这张表就能回答 "我该用哪个?" — 不必把整页读完。
| Technique | What it stores | When it runs | Disk & RAM | Best for | Mutability |
|---|---|---|---|---|---|
🦴 Modelfile SYSTEM |
A few sentences of identity | Every reply, automatically | ~2 GB (base model only) | Personality, tone, role, language | Rebuild model to change |
| 📚 LlamaIndex on your notes | Your .md files as vectors |
Only when you ask a relevant question | + ~10 MB index for ~10 notes | Personal facts you edit often | Edit a file, re-run, done |
| 🧠 LlamaIndex on Karpathy | 23 blog posts as vectors | Only on Karpathy-shaped questions | + ~50 MB saved index | A larger fixed corpus | Re-clone & re-embed to update |
| 🛠️ Hermes 3 agent | Tool descriptions (docstrings) | When the model decides a tool is needed | ~5 GB model + 6 GB RAM | Math, files, dates, real actions | Add a Python function, restart |
| 🔧 Fine-tuning (not in this guide) | New model weights | Always, baked into the model | Hours of GPU time per training run | Style; rarely facts | Full re-train |
🧭 30-second decision rule
Who the model is → Modelfile. What the model knows → LlamaIndex. What the model does → Hermes agent. If you can't pick, you probably want two of them — the techniques compose freely.
โมเดล "เป็นใคร" → Modelfile โมเดล "รู้อะไร" → LlamaIndex โมเดล "ทำอะไรได้" → Hermes agent ถ้าตัดสินใจไม่ได้ ก็น่าจะใช้สองอย่างพร้อมกัน — สามวิธีนี้ผสมกันได้ตามต้องการ
模型"是谁" → Modelfile。模型"知道什么" → LlamaIndex。模型"能做什么" → Hermes agent。如果你分不清,多半两种都需要 — 这几种方法可以自由组合。
✅ Before you start
OVERVIEW · ภาพรวม · 概览
In this section: check that your PC is strong enough, and learn how to open PowerShell.
ในส่วนนี้: เช็คว่าพีซีของคุณแรงพอ และหัดเปิด PowerShell
本节内容:检查你的电脑够不够强,并学会打开 PowerShell。
🇬🇧 English
You need a Windows 10 or 11 PC, at least 16 GB of RAM, and around 15 GB of free disk space for the models. An NVIDIA GPU helps but isn't required. You also need to be comfortable opening PowerShell.
🇹🇭 ไทย
คุณต้องใช้พีซี Windows 10 หรือ 11 RAM อย่างน้อย 16 GB และพื้นที่ดิสก์ว่างประมาณ 15 GB สำหรับเก็บโมเดล มีการ์ดจอ NVIDIA จะช่วยให้เร็วขึ้นแต่ไม่จำเป็น และต้องเปิดแอป PowerShell เป็น
🇨🇳 中文
你需要一台 Windows 10 或 11 电脑,至少 16 GB 内存,约 15 GB 可用磁盘空间存放模型。有 NVIDIA 显卡会更快,但不是必须的。你还需要会打开 PowerShell。
🇬🇧 Open PowerShell
Right-click the Start button → Terminal or Windows PowerShell. A blue window opens. This is where every command in this guide goes.
🇹🇭 เปิด PowerShell
คลิกขวาที่ปุ่ม Start → Terminal หรือ Windows PowerShell หน้าต่างสีน้ำเงินจะเปิดขึ้น คำสั่งทั้งหมดในคู่มือนี้พิมพ์ลงในหน้าต่างนี้
🇨🇳 打开 PowerShell
右键点击 开始 按钮 → 终端 或 Windows PowerShell。会打开一个蓝色窗口。本指南中所有命令都在这里输入。
⚡ Lazy path: one script does everything
OVERVIEW · ภาพรวม · 概览
In this section: one script installs everything for you. Take this road if you want to start fast. Take the manual road below if you want to learn each step.
ในส่วนนี้: สคริปต์เดียวติดตั้งทุกอย่างให้คุณ ใช้ทางนี้ถ้าอยากเริ่มเร็ว หรือใช้ทางติดตั้งเองด้านล่างถ้าอยากเรียนรู้ทีละขั้น
本节内容:一个脚本帮你装好一切。想快点开始就走这条路;想学会每一步,就走下面的手动路线。
If you trust the script, download the bundle below, then run:
ถ้าคุณไว้ใจสคริปต์ ดาวน์โหลดไฟล์ด้านล่างแล้วรัน:
如果你信任这个脚本,下载下面的文件包,然后运行:
The script may stop after installing Git, Ollama, or Python and ask you to close and re-open PowerShell so PATH updates. Just do that and run it again — it picks up where it left off. If you'd rather learn what each step does, skip the script and follow the manual steps below.
สคริปต์อาจหยุดหลังจากติดตั้ง Git, Ollama หรือ Python และขอให้คุณปิด-เปิด PowerShell ใหม่เพื่อให้ PATH อัปเดต ทำตามแล้วรันใหม่ — สคริปต์จะรันต่อจากที่หยุดไว้ ถ้าอยากเรียนรู้ว่าแต่ละขั้นตอนทำอะไร ข้ามสคริปต์ไปทำตามขั้นตอนด้านล่างได้
脚本在安装完 Git、Ollama 或 Python 后可能会停下,让你关掉 PowerShell 再重新打开(这样 PATH 会更新)。照做后再跑一遍 — 脚本会从中断处继续。如果你想了解每一步在做什么,跳过脚本,按下面的手动步骤来。
🛠️ Manual setup, step by step
OVERVIEW · ภาพรวม · 概览
In this section: install each piece yourself, one step at a time — winget, then Ollama, then three models, then Python.
ในส่วนนี้: ติดตั้งทีละชิ้นด้วยตัวเอง — winget แล้ว Ollama แล้วโมเดลสามตัว แล้วก็ Python
本节内容:自己动手,一步一步安装 — 先 winget,再 Ollama,然后三个模型,最后是 Python。
1 Check that winget works
winget คือตัวจัดการแพ็กเกจที่มากับ Windows (Windows 10 1809+ และ Windows 11 ทุกเวอร์ชั่น) เราจะใช้มันติดตั้งทุกอย่าง ถ้าคำสั่งด้านล่าง error ให้ติดตั้ง "App Installer" จาก Microsoft Store ก่อน
winget 是 Windows 自带的包管理器(Windows 10 1809+ 和所有 Windows 11 都有)。我们会用它装所有东西。如果下面的命令报错,先从微软商店装 "App Installer"。
2 Install Ollama
Ollama is the runner that downloads and serves
Ollama คือตัวรันที่ดาวน์โหลดและให้บริการโมเดลภาษาบนพีซีของคุณ มีตัวติดตั้งที่ ollama.com/download ถ้าชอบใช้แบบนั้น
Ollama 是在你的电脑上下载并运行语言模型的程序。如果你更喜欢用安装器,也可以从 ollama.com/download 下载。
Then open the Ollama app from the Start menu once. It runs in the system tray (bottom-right corner, near the clock); leave it running. Close and re-open PowerShell so the new ollama command is on PATH.
จากนั้นเปิดแอป Ollama จาก Start menu หนึ่งครั้ง แอปจะทำงานใน system tray (มุมขวาล่างใกล้นาฬิกา) — เปิดทิ้งไว้ ปิด-เปิด PowerShell ใหม่ เพื่อให้คำสั่ง ollama อยู่บน PATH
然后从开始菜单打开一次 Ollama 应用。它会在系统托盘里运行(右下角时钟旁边)— 让它一直开着。关掉并重新打开 PowerShell,这样新的 ollama 命令才能用。
3 Pull three models
Each pull downloads a model to your PC. Total ≈ 8 GB. Go make tea.
แต่ละ pull ดาวน์โหลดโมเดลลงเครื่อง รวมประมาณ 8 GB ไปชงชาก่อน
每个 pull 下载一个模型到电脑里。总共约 8 GB。去泡杯茶吧。
📦 What you actually downloaded
| Model | Disk size | RAM needed | What it does | Used by | Speed (CPU vs GPU) |
|---|---|---|---|---|---|
llama3.2 (3B) |
~2.0 GB | ~4 GB | General chat — answers questions in natural language | Tech 2 (kru-ai), Tech 3 & 4 (RAG) | ~8–20 tok/s CPU · 60+ tok/s GPU |
nomic-embed-text |
~274 MB | ~1 GB | Turns each chunk of text into a 768-number vector — no chat ability | Tech 3 & 4 (LlamaIndex indexing & querying) | Very fast on CPU — used briefly, then idle |
hermes3:8b |
~4.7 GB | ~6 GB | Tool-calling agent — picks which Python function to run | Tech 5 (agent.py) | ~5–12 tok/s CPU · 35+ tok/s GPU |
| Totals | ~7 GB | peak 6 GB | Only one model is loaded at a time — Ollama swaps as scripts call them. | — | |
"Tokens per second" (tok/s) is roughly 0.75 words per second — so 10 tok/s ≈ 450 words per minute, faster than most humans type.
"Tokens per second" (tok/s) ประมาณ 0.75 คำต่อวินาที — ดังนั้น 10 tok/s ≈ 450 คำ/นาที เร็วกว่าคนพิมพ์
"每秒 token 数"(tok/s)大约相当于 0.75 个英文单词 — 所以 10 tok/s ≈ 450 字/分钟,比大多数人打字还快。
4 Set up Python
You need Python 3.11 or newer. Windows does not ship with Python — we install it via winget, then create an isolated virtual environment.
คุณต้องใช้ Python 3.11 หรือใหม่กว่า Windows ไม่ได้ มี Python มาให้ — เราติดตั้งผ่าน winget แล้วสร้าง virtual environment แยก
你需要 Python 3.11 或更新版本。Windows 不 自带 Python — 我们通过 winget 安装,然后创建一个隔离的虚拟环境。
If Activate.ps1 errors with "running scripts is disabled", run this once in the same window:
ถ้า Activate.ps1 error ว่า "running scripts is disabled" ให้รันคำสั่งนี้หนึ่งครั้งในหน้าต่างเดียวกัน:
如果 Activate.ps1 报错 "running scripts is disabled",在同一窗口运行一次:
🍵 What's .venv for?
It keeps the AI packages separate from the rest of your computer. If something breaks, you can throw the folder away without affecting anything else.
มันแยก package ของ AI ออกจากส่วนอื่นของคอมพิวเตอร์ ถ้ามีอะไรพัง คุณลบโฟลเดอร์ทิ้งได้โดยไม่กระทบส่วนอื่น
它把 AI 的依赖包和电脑其他部分隔开。万一出问题,整个文件夹删掉也不会影响别的。
🦙 Tech 1 — Ollama, the local runner
OVERVIEW · ภาพรวม · 概览
In this section: meet Ollama, the program that runs AI models on your PC. Every other part of this guide sits on top of it.
ในส่วนนี้: รู้จัก Ollama โปรแกรมที่รันโมเดล AI บนพีซีของคุณ ทุกส่วนที่เหลือของคู่มือนี้ต่อยอดจากมัน
本节内容:认识 Ollama — 在你电脑上运行 AI 模型的程序。本指南的其他一切都建立在它之上。
Think of Ollama as a small
นึกถึง Ollama เป็นเครื่องเล่นเล็ก ๆ บนพีซีที่รู้วิธีโหลดและรันโมเดลภาษา หลังจากดาวน์โหลดโมเดลแล้ว คุณคุยกับมันได้โดยไม่ต้องต่อเน็ตเลย
把 Ollama 想成电脑上一个小小的播放器,它知道如何加载和运行语言模型。模型下载完后,你可以完全离线和它对话。
Test it:
ทดสอบดู:
试试看:
🦴 Tech 2 — The "in the bones" system prompt
OVERVIEW · ภาพรวม · 概览
In this section: the first upgrade. A Modelfile writes a job description into the model. After that, the model always knows who it is.
ในส่วนนี้: อัปเกรดแรก Modelfile เขียน "ใบพรรณนางาน" เข้าไปในโมเดล หลังจากนั้นโมเดลจะรู้เสมอว่าตัวเองเป็นใคร
本节内容:第一次升级。Modelfile 把一份工作说明写进模型。从此模型永远知道自己是谁。
A
ระบบพรอมต์คือคำสั่งที่โมเดลอ่าน ก่อนเริ่มทุกบทสนทนา ด้วย Modelfile คุณ "อบ" คำสั่งเหล่านี้เข้าไปในโมเดลของคุณเอง คุณไม่ต้องพิมพ์ซ้ำอีก
系统提示是模型在每次对话前都会读的指令。通过 Modelfile,你把这些指令 "烤" 进自己的定制模型,再也不用重复输入。
Build the model
🦴 Why "in the bones"?
The SYSTEM block is part of the model's identity. It is not part of the conversation. It runs every time. It is never forgotten. A student cannot erase it by accident. Bake in the rules every reply should follow: who the model is, who the student is, which language, how long to answer. Do not bake in facts that change often — put those in LlamaIndex.
บล็อก SYSTEM เป็นส่วนหนึ่งของ "ตัวตน" ของโมเดล ไม่ใช่ส่วนหนึ่งของบทสนทนา มันทำงานทุกครั้ง ไม่ถูกลืม และนักเรียนลบทิ้งโดยบังเอิญไม่ได้ อบเข้าไปเฉพาะสิ่งที่ทุกคำตอบควรทำตาม: โมเดลคือใคร นักเรียนคือใคร ใช้ภาษาอะไร ตอบยาวแค่ไหน อย่าอบข้อเท็จจริงที่คุณเปลี่ยนบ่อย — ของแบบนั้นอยู่ใน LlamaIndex
SYSTEM 块是模型 "身份" 的一部分,不是对话的一部分。它每次都会运行,永远不会被忘记,学生也不会不小心把它删掉。烤进去的应是每次回答都该遵循的内容:模型是谁、学生是谁、用什么语言、答多长。不要烤进会经常变的事实 — 那些应该放进 LlamaIndex。
📚 Tech 3 — LlamaIndex on your own notes
OVERVIEW · ภาพรวม · 概览
In this section: the second upgrade. LlamaIndex lets the model read your own notes before it answers. This trick is called RAG.
ในส่วนนี้: อัปเกรดที่สอง LlamaIndex ให้โมเดลอ่านโน้ตของคุณเองก่อนตอบ เทคนิคนี้เรียกว่า RAG
本节内容:第二次升级。LlamaIndex 让模型在回答前先读你自己的笔记。这个技巧叫 RAG。
Retrieval-augmented generation หรือ RAG คือวิธีให้โมเดลรู้จัก ไฟล์ ของคุณ โมเดลไม่ได้จำไฟล์ — มันค้นหาตอนที่คุณถาม เหมือนนักเรียนหยิบหนังสือเล่มที่ถูกต้องจากชั้น
检索增强生成(RAG)就是把文件知识喂给模型的方式。模型并不记住文件 — 它在你提问时去查,就像学生从书架上拿对应的那本书。
📌 The 14-year-old version — Tech 3 vs Tech 4
LlamaIndex is just a tool. You hand it a folder of files, and it lets you ask questions about what's inside them. That's it. Here in Tech 3, we hand it a folder you make yourself — your own notes. Next, in Tech 4, we use the same tool and a nearly identical Python script — but we point it at Karpathy's blog instead. Same tool. Same model. Different folder. About three lines of code change between them.
LlamaIndex เป็นแค่เครื่องมือ คุณยื่นโฟลเดอร์ไฟล์ให้มัน แล้วถามคำถามเกี่ยวกับไฟล์เหล่านั้นได้ แค่นั้นเอง ตรงนี้ใน Tech 3 เราจะให้โฟลเดอร์ที่คุณสร้างเอง — โน้ตของคุณเอง ถัดไปใน Tech 4 เราใช้เครื่องมือเดิมและสคริปต์ Python ที่เกือบเหมือนกัน — แต่ชี้ไปที่บล็อกของ Karpathy แทน เครื่องมือเดียวกัน โมเดลเดียวกัน คนละโฟลเดอร์ โค้ดเปลี่ยนแค่ประมาณ 3 บรรทัด
LlamaIndex 就是个工具。给它一个文件夹,你就能问关于这些文件的问题。就这样。这里的 Tech 3,我们给它一个你自己做的文件夹 — 你自己的笔记。接下来的 Tech 4,我们用同一个工具、几乎一模一样的 Python 脚本 — 但指向 Karpathy 的博客。同一个工具、同一个模型、不同的文件夹。代码只改大概 3 行。
Run it
🔍 The citation matters
Look at the sources line. The model didn't guess — it pulled the answer from a real file you wrote. That's the whole point of RAG. If a chatbot can't cite its source, you can't trust the answer.
ดูบรรทัด sources โมเดลไม่ได้ เดา — มันดึงคำตอบจากไฟล์จริงที่คุณเขียน นี่คือหัวใจของ RAG ถ้าแชทบอทอ้างที่มาไม่ได้ คุณไว้ใจคำตอบไม่ได้
看 sources 那一行。模型并不是在猜 — 它从你写的真实文件里取出答案。这正是 RAG 的核心。聊天机器人如果不能引用来源,就不要相信它的回答。
🧠 Tech 4 — LlamaIndex on Karpathy's blog
OVERVIEW · ภาพรวม · 概览
In this section: the same RAG trick, but on a bigger library — Karpathy's blog. Only the folder changes.
ในส่วนนี้: เทคนิค RAG เดิม แต่ใช้กับห้องสมุดที่ใหญ่ขึ้น — บล็อกของ Karpathy เปลี่ยนแค่โฟลเดอร์
本节内容:同样的 RAG 技巧,用在更大的书库上 — Karpathy 的博客。只是文件夹变了。
Andrej Karpathy is a famous AI teacher — ex-Tesla, ex-OpenAI, Stanford CS231n lecturer. His old blog at karpathy.github.io has about 20 markdown essays. We'll point LlamaIndex at that folder and get a Karpathy-flavoured tutor.
Andrej Karpathy เป็นครู AI ชื่อดัง — เคยอยู่ Tesla, OpenAI และสอนวิชา CS231n ที่ Stanford บล็อกเก่าของเขาที่ karpathy.github.io มีบทความ markdown ประมาณ 20 ชิ้น เราจะชี้ LlamaIndex ไปที่โฟลเดอร์นั้น แล้วได้ติวเตอร์รสชาติแบบ Karpathy
Andrej Karpathy 是知名的 AI 老师 — 前 Tesla、前 OpenAI、斯坦福 CS231n 课程讲师。他在 karpathy.github.io 的旧博客大约有 20 篇 markdown 文章。我们让 LlamaIndex 指向那个文件夹,就能得到一个 Karpathy 风味的家教。
📌 Same tool as Tech 3 — only the folder changed
This is the exact same LlamaIndex from Tech 3. Same chat model (llama3.2), same embedder (nomic-embed-text), same pipeline. We just swapped your notes/ folder for a folder of Karpathy's blog posts (karpathy_blog/_posts/). The Python file is almost identical to tutor.py — only the folder path it reads from is different.
นี่คือ LlamaIndex ตัวเดียวกัน กับใน Tech 3 โมเดลแชทเดิม (llama3.2) ตัว embed เดิม (nomic-embed-text) ขั้นตอนเดิม แค่เปลี่ยนจากโฟลเดอร์ notes/ ของคุณ เป็นโฟลเดอร์บล็อกของ Karpathy (karpathy_blog/_posts/) สคริปต์ Python เกือบเหมือน tutor.py ทุกอย่าง — เปลี่ยนแค่ path ของโฟลเดอร์ที่อ่าน
这就是 Tech 3 里同一个 LlamaIndex。同样的聊天模型(llama3.2)、同样的 embed 模型(nomic-embed-text)、同样的流程。只是把你的 notes/ 文件夹换成了 Karpathy 的博客文件夹(karpathy_blog/_posts/)。Python 脚本和 tutor.py 几乎一样 — 只改了它读取的文件夹路径。
Setup
Git doesn't come with Windows. If you don't have it, install with: winget install -e --id Git.Git and re-open PowerShell.
Windows ไม่ได้มี Git มาให้ ถ้ายังไม่มี ติดตั้งด้วย: winget install -e --id Git.Git แล้วเปิด PowerShell ใหม่
Windows 不自带 Git。如果没装,运行:winget install -e --id Git.Git,然后重新打开 PowerShell。
⚠️ This is still RAG, not fine-tuning
The model didn't become Karpathy. It learned how to look up his words quickly. If you delete the karpathy_index/ folder, the model goes back to being plain llama3.2 with no idea who Karpathy is. The index is the library; the model is just the librarian who can read it.
โมเดลไม่ได้ "กลายเป็น" Karpathy มันแค่เรียนรู้วิธีค้นหาคำพูดของเขาได้เร็ว ถ้าคุณลบโฟลเดอร์ karpathy_index/ ทิ้ง โมเดลก็กลับไปเป็น llama3.2 ธรรมดา ไม่รู้ด้วยซ้ำว่า Karpathy คือใคร index คือห้องสมุด โมเดลเป็นเพียงบรรณารักษ์ที่อ่านได้
模型并没有"变成" Karpathy。它只是学会了快速查找他的话。如果你删除 karpathy_index/ 文件夹,模型就回到普通的 llama3.2,根本不知道 Karpathy 是谁。索引是图书馆;模型只是会读书的图书管理员。
🛠️ Tech 5 — Hermes, the tool-using agent
OVERVIEW · ภาพรวม · 概览
In this section: the third upgrade. Hermes 3 is a model that can use tools. This is the step where your tutor becomes an agent.
ในส่วนนี้: อัปเกรดที่สาม Hermes 3 คือโมเดลที่ใช้เครื่องมือได้ นี่คือขั้นที่ติวเตอร์ของคุณกลายเป็น agent
本节内容:第三次升级。Hermes 3 是会用工具的模型。这一步,你的家教变成了代理。
So far, the model has only talked. An
ที่ผ่านมาโมเดลแค่ พูด แต่
到目前为止模型只是 说话。代理(agent)能 做事 — 它会决定调用计算器、读文件、查日期,然后拿着结果继续对话。Hermes 3 是 NousResearch 专门微调的模型,特别擅长可靠地选择工具。
Run it
🎯 Why agents are different
A chatbot only produces text. An agent can cause things to happen: read a file, send an email, run code, open a website. Tools are how the model touches the world. Every tool you add expands what your AI can do, not just what it can say.
แชทบอทผลิตได้แต่ข้อความ agent ทำให้สิ่งต่าง ๆ เกิดขึ้น ได้: อ่านไฟล์ ส่งอีเมล รันโค้ด เปิดเว็บ เครื่องมือคือวิธีที่โมเดล "สัมผัส" โลก ทุกเครื่องมือที่คุณเพิ่มเข้าไปขยายสิ่งที่ AI ของคุณ ทำได้ ไม่ใช่แค่สิ่งที่ พูดได้
聊天机器人只能产生文字。代理能 让事情发生:读文件、发邮件、运行代码、打开网页。工具是模型 "触摸" 世界的方式。你每加一个工具,AI 能 做 的事就多一点 — 不只是能 说 的事多一点。
🧮 When to use which
OVERVIEW · ภาพรวม · 概览
In this section: one table to help you pick the right technique for each job.
ในส่วนนี้: ตารางเดียวที่ช่วยเลือกเทคนิคให้เหมาะกับแต่ละงาน
本节内容:一张表,帮你为每件事挑对技巧。
| I want the model to… | Use | Why |
|---|---|---|
| Always sound like Kru AI | Modelfile SYSTEM | Identity should be unchangeable and "free" — no extra retrieval cost. |
| Remember my class notes | LlamaIndex on notes/ | Few files, change often. RAG looks them up at question time. |
| Know Karpathy's writing | LlamaIndex on karpathy_blog/ | Larger corpus. The saved index makes lookups instant. |
| Do maths, read files, send messages | Hermes 3 + tools | Plain LLMs are bad at maths and can't touch the world. Agents can. |
| Memorise a million facts forever | None of the above — fine-tune | Not in this guide. Fine-tuning is good at teaching style, bad at teaching facts. |
🔬 Code walkthroughs
OVERVIEW · ภาพรวม · 概览
In this section: the two scripts, line by line. Read this when you want to know why the code works, not just how to run it.
ในส่วนนี้: สองสคริปต์แบบบรรทัดต่อบรรทัด อ่านเมื่ออยากรู้ว่าทำไมโค้ดถึงทำงาน ไม่ใช่แค่รันยังไง
本节内容:逐行讲解两个脚本。想知道代码为什么能跑(而不只是怎么跑)就读这里。
Click a panel to open it. Each panel shows the full Python code, with numbered notes that explain each part.
คลิกที่แผงเพื่อขยาย แต่ละแผงแสดงโค้ด Python ทั้งหมดพร้อมหมายเหตุที่อธิบายว่าแต่ละส่วนทำอะไร
点击面板展开。每个面板展示完整的 Python 源码,附带编号说明每一部分的作用。
📚 How tutor.py works — RAG over your notes
🇬🇧 English
One script, about 50 lines. It reads every .md file in notes/. It turns each piece into numbers with nomic-embed-text. It stores the numbers in a vector index. Then it loops: take a question, find the 3 best matching pieces, and give them to llama3.2 to answer.
🇹🇭 ไทย
สคริปต์เดียว 50 บรรทัด อ่านไฟล์ .md ทุกไฟล์ใน notes/ แปลงเป็นตัวเลขด้วย nomic-embed-text เก็บไว้ใน vector index แล้ววนลูป: รับคำถาม ดึงชิ้นที่ตรงที่สุด 3 ชิ้น ส่งให้ llama3.2 ตอบ
🇨🇳 中文
一个脚本,50 行代码。它读取 notes/ 里所有 .md 文件,用 nomic-embed-text 把每个片段转成数字,存进向量索引,然后循环:接收问题,取出最匹配的 3 个片段,交给 llama3.2 回答。
The source, with markers
What each marker means
- ⓪The Modelfile, in Python.
SYSTEM_PROMPT+MODEL_PARAMETERS+ensure_kru_ai()together do exactly whatollama create kru-ai -f Modelfiledoes — bake the persona and parameters into a customkru-aimodel on first run. The check is EAFP ("easier to ask forgiveness than permission"): tryollama.show(), and if it raises, create the model. Idempotent — re-running the script after the model exists is a no-op. This fuses Tech 2 + Tech 3 into one self-contained script; the standaloneModelfilefile is no longer needed. - ①Imports. Pull in
ollama(for creating the custom model), LlamaIndex (the RAG library), and the Ollama wrappers for the chat model and embedding model. - ②Where your notes live. A relative path — the script expects a
notes/folder next to itself. Drop your markdown files in there. - ③Wire up Ollama. Two global
Settingstell LlamaIndex which models to use:llama3.2for chat,nomic-embed-textfor turning text into numbers.request_timeout=180is generous — embedding can take a minute on first run. - ④Read the files.
SimpleDirectoryReaderwalks the folder, opens each.mdfile, and returns a list ofDocumentobjects.recursive=Truemeans it'll find files in sub-folders too. - ⑤Build the index. This line does the expensive work: it chops every doc into chunks, sends each chunk to
nomic-embed-text, gets a vector back, and stores them all. On a typical Windows laptop with a dozen short notes this takes ~10 seconds; with Karpathy's blog it takes minutes. - ⑥Make a query engine. A thin wrapper that knows how to: embed a question, find the closest 3 stored vectors, paste those chunks into a prompt, and send the prompt to
llama3.2.similarity_top_k=3is the knob — higher means more context but slower. - ⑦Conversation loop. Read a line from the user. Empty line quits. Nothing fancy.
- ⑧The actual query.
engine.query()is where the magic happens — embed → retrieve → assemble prompt → call LLM → return answer. Theresponse.source_nodeslist is the receipt: it tells you which file each chunk came from, so you can verify the answer. - ⑨The entry point. When you run
python tutor.py, Python sets__name__ = "__main__", this guard fires, andmain()runs. When this file is imported from another script (e.g.,from tutor import ensure_kru_ai),__name__is"tutor"instead, the guard is False, andmain()does not auto-run — so you can reuseensure_kru_ai()on its own without starting the chat loop. This convention appears in nearly every well-written Python script.
engine.query() — step ⑧ in the code above.🛠️ How agent.py works — ReAct + tools
🇬🇧 English
An agent does not just answer. It thinks about which tool to call. It acts by calling the tool. It reads the result. It repeats this until it has the answer. This pattern is called ReAct. Four plain Python functions become the agent's hands.
🇹🇭 ไทย
Agent คือโมเดลที่ไม่ได้แค่ตอบ — มัน คิด ว่าควรเรียกเครื่องมือไหน ลงมือ เรียกมัน อ่านผลลัพธ์ แล้ววนลูปจนกว่าจะได้คำตอบ รูปแบบนี้เรียกว่า ReAct ฟังก์ชัน Python ธรรมดา 4 ตัวกลายเป็น "มือ" ของ agent
🇨🇳 中文
代理不只是回答 — 它会 推理 该调用哪个工具,行动 调用它,读取结果,然后循环直到得到答案。这种模式叫 ReAct。四个普通的 Python 函数就成了代理的 "双手"。
The source, with markers
What each marker means
- ①Tools are plain functions. No special class, no decorator, no magic. Just regular Python with type hints. The agent will see four "abilities" it can use.
- ②The docstring is the contract. Hermes reads this exact sentence to decide whether to call the function.
"Multiply two numbers and return the product."is what tells the model "this is the math tool." A bad docstring is the #1 reason an agent picks the wrong tool. - ③Register the tools.
FunctionTool.from_defaults()wraps each Python function in a description the LLM can read. TheTOOLSlist is the menu. - ④Pick the model. Plain
llama3.2is bad at tool use — it'll make up arguments or call the wrong tool. Hermes 3 was fine-tuned by NousResearch specifically for reliable tool selection. Use it for agents; usellama3.2for chat. Bigger timeout (300s) because tool loops can have several round-trips. - ⑤Build the agent.
ReActAgent= Reason + Act.verbose=Trueprints the model's thinking ("Thought: I need to multiply") so students can watch the loop in action. - ⑥Outer chat loop. Wait for a human question. Empty line quits.
- ⑦The agent's inner loop hides here.
agent.chat(q)does not return after one LLM call. It runs the full ReAct cycle: think → choose tool → call it → read result → think again — until the model decides it has a final answer. Could be one tool call, could be four.
One trip through agent.chat()
🎯 Where to focus when the agent misbehaves
90% of agent bugs are not in the loop — they're in the docstrings. If the agent calls the wrong tool, rewrite the docstring to say exactly what the tool does and when to use it. If it makes up arguments, add the argument format to the docstring (e.g. "date in YYYY-MM-DD format").
90% ของบั๊กใน agent ไม่ได้อยู่ในลูป — มันอยู่ใน docstring ถ้า agent เรียกเครื่องมือผิด ให้แก้ docstring ให้บอกชัด ๆ ว่าเครื่องมือทำอะไรและควรใช้เมื่อไหร่ ถ้ามันแต่งอาร์กิวเมนต์ขึ้นมาเอง ให้ระบุรูปแบบของอาร์กิวเมนต์ลงใน docstring (เช่น "date in YYYY-MM-DD format")
代理出问题 90% 都不在循环里 — 都在 docstring。如果代理调错了工具,把 docstring 改得更清楚:说明工具到底是干什么的、什么时候用。如果它瞎编参数,就把参数格式写进 docstring(比如 "date in YYYY-MM-DD format")。
📥 Download the files
OVERVIEW · ภาพรวม · 概览
In this section: all seven files, ready to download.
ในส่วนนี้: ไฟล์ทั้ง 7 พร้อมดาวน์โหลด
本节内容:全部 7 个文件,随时可下载。
Save these to a folder called windows_stack\ in your Downloads, then follow the manual setup or run setup_windows.ps1.
บันทึกไฟล์เหล่านี้ลงในโฟลเดอร์ชื่อ windows_stack\ ใน Downloads ของคุณ จากนั้นทำตามขั้นตอนติดตั้งเองหรือรัน setup_windows.ps1
把这些文件保存到 Downloads 里一个叫 windows_stack\ 的文件夹,然后按手动步骤来,或者直接运行 setup_windows.ps1。
🩹 When things go wrong
OVERVIEW · ภาพรวม · 概览
In this section: the five most common problems, each with its fix.
ในส่วนนี้: ปัญหาที่พบบ่อยที่สุด 5 ข้อ พร้อมวิธีแก้ของแต่ละข้อ
本节内容:五个最常见的问题,各配一个解决办法。
"running scripts is disabled on this system"
PowerShell's default policy blocks script execution. Run this once in the same window, then try again: Set-ExecutionPolicy -Scope Process -ExecutionPolicy Bypass -Force. Only affects the current window — safer than changing it system-wide.
นโยบายเริ่มต้นของ PowerShell บล็อกการรันสคริปต์ รันคำสั่งนี้หนึ่งครั้งในหน้าต่างเดียวกัน แล้วลองใหม่: Set-ExecutionPolicy -Scope Process -ExecutionPolicy Bypass -Force มีผลแค่หน้าต่างปัจจุบัน — ปลอดภัยกว่าเปลี่ยนทั้งระบบ
PowerShell 默认策略不允许运行脚本。在同一窗口运行一次:Set-ExecutionPolicy -Scope Process -ExecutionPolicy Bypass -Force,然后重试。只影响当前窗口 — 比改全局设置更安全。
"'ollama' is not recognized as a cmdlet"
Ollama installed but its folder isn't on PATH yet. Open the Ollama app from the Start menu so it shows in the system tray, then close PowerShell and open a fresh window.
ติดตั้ง Ollama แล้วแต่โฟลเดอร์ของมันยังไม่อยู่บน PATH เปิดแอป Ollama จาก Start menu ให้แสดงใน system tray แล้วปิด PowerShell เปิดหน้าต่างใหม่
Ollama 装好了但目录还没加进 PATH。从开始菜单打开 Ollama 应用让它出现在系统托盘,然后关掉 PowerShell 重新打开一个窗口。
First Karpathy index takes forever
5–10 minutes is normal on Windows without a GPU. Embedding 23 blog posts is expensive once, then the saved index makes every later run instant.
5-10 นาทีเป็นเรื่องปกติบน Windows ที่ไม่มี GPU การ embed บล็อก 23 บทความใช้เวลาแพงครั้งเดียว หลังจากนั้น index ที่เซฟไว้จะทำให้รันครั้งต่อ ๆ ไปเร็วทันที
Windows 上没有 GPU 时 5–10 分钟正常。给 23 篇博客做 embedding 是一次性的开销,索引保存后之后每次运行都瞬间完成。
Responses are crawling slow
Without an NVIDIA GPU + CUDA drivers, Ollama runs on CPU. Pull a smaller model — ollama pull llama3.2:1b — and edit the scripts to use it. Llama 3.2 1B is much faster but less smart; fine for short answers.
ถ้าไม่มี GPU NVIDIA + ไดรเวอร์ CUDA Ollama จะรันบน CPU ใช้โมเดลเล็กกว่า — ollama pull llama3.2:1b — แล้วแก้สคริปต์ให้ใช้มัน Llama 3.2 1B เร็วกว่ามากแต่ฉลาดน้อยกว่า เหมาะกับคำตอบสั้น ๆ
没有 NVIDIA 显卡和 CUDA 驱动时,Ollama 用 CPU 运行。pull 一个小一点的模型 — ollama pull llama3.2:1b — 然后改脚本用它。Llama 3.2 1B 快很多但智商低一些,适合短答案。
Hermes refuses to call a tool
Re-pull the model (ollama pull hermes3:8b) and check your function has a clear one-line docstring. Hermes uses the docstring as the tool description — without it, the model doesn't know what the tool is for.
Pull โมเดลใหม่ (ollama pull hermes3:8b) และตรวจสอบว่าฟังก์ชันของคุณมี docstring บรรทัดเดียวที่ชัดเจน Hermes ใช้ docstring เป็นคำอธิบายเครื่องมือ — ถ้าไม่มี โมเดลจะไม่รู้ว่าเครื่องมือนี้ใช้ทำอะไร
重新 pull 模型(ollama pull hermes3:8b),并检查你的函数有清晰的单行 docstring。Hermes 用 docstring 作为工具描述 — 没有的话,模型根本不知道工具是干嘛的。